volshow関数を用いたVolume Rendering
Contents
dicomreadVolume関数でCTのdicom fileの読み込み
R2017bからimage processing toolboxにdicomreadVolumeという関数が用意されました。 今までdicomreadとdicominfoを組み合わせてDICOMファイルを1枚1枚読んで位置関係をチェックしながら 三次元配列を作成していたのですが、これで便利になりました。
CTfolder='C:\Users\hashi\OneDrive\ドキュメント\MATLAB\CT';% CT DICOMのあるフォルダ
CTfolder='E:\MATLAB\CT';
[V,spatial,dim]=dicomreadVolume(CTfolder);
size(V)
V=squeeze(V);% Vは4次元配列で1の次元を削除
ans =

   512   512     1   125
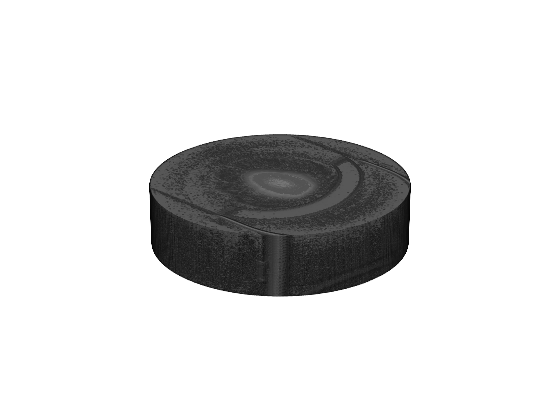
volshow関数でvolume rendering表示
R2018bからimage processing toolboxにvolume renderingの関数volshowが用意されました。使ってみます。 どうもaxes上に表示されるのではなくuipanel上に表示されるのでdaspectやview関数は使えません。
figure;
map=gray(256);% colormapは256固定!
scale=[spatial.PixelSpacings(1,:),spatial.PatientPositions(2,3)-spatial.PatientPositions(1,3)];
volshow(V,'Colormap',map,'BackGroundColor',[1,1,1]);
daspect(1./scale); % 反映しません!
view([0,90]);% 反映しません!
figure;
hvol=volshow(V,'Colormap',map,'BackGroundColor',[1,1,1]);
hvol %これを操作すればよい
daspect(1./scale); % 反映しません!
set(hvol,'ScaleFactors',scale,'CameraViewAngle',5);
hvol =

  volshow のプロパティ:

                 Parent: [1×1 Panel]
               Alphamap: [256×1 double]
               Colormap: [256×3 double]
               Lighting: 1
        IsosurfaceColor: [1 0 0]
               Isovalue: 0.5000
               Renderer: 'VolumeRendering'
         CameraPosition: [4 4 2.5000]
         CameraUpVector: [0 0 1]
           CameraTarget: [0 0 0]
        CameraViewAngle: 15
        BackgroundColor: [1 1 1]
           ScaleFactors: [1 1 1]
    InteractionsEnabled: 1

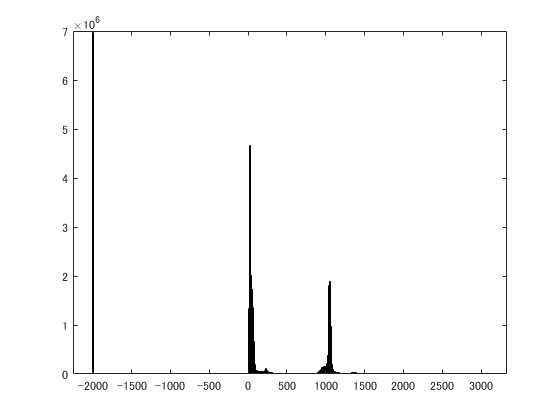
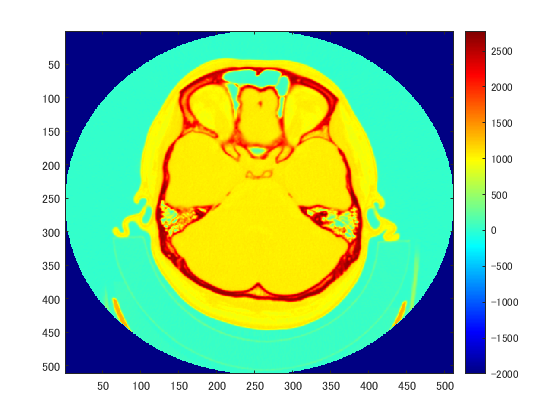
volshow関数でintensityを変化させてみる
さらにvolshowはgraphic objectではないのでfindobj関数が使えず勝手が悪いです。 parent objectがfigureかuipanelしかありません。 1つのfigureに複数のvolshowを表示させるにはuipanelを並べるしかないようです。 intensityは・・・・よくわかりません。volumeViewer関数を使えばもっとお気楽に楽しめます。 alphamapはどうも三次元配列の最小値~最大値を256等分し、その透過度を設定しているようです。 なお、lightingがあると判断しにくいので初期設定のtrueからfalseに変更してます。
close all;
figure;histogram(V(:));% ヒストグラムをチェックして再表示
[min(V(:)),max(V(:))]
figure;imagesc(squeeze(V(:,:,30)));colormap(jet(256));colorbar;% 軟部組織は1000前後、骨は2500くらい
W=V;
W(W<0)=0;
vmax=2047;
W(W>vmax)=vmax;
queryPoints=linspace(0,vmax,256);% 256固定
hf=figure;
alpha=[0,0,1,1];
for n=1:4
    switch n
        case 1;intensity=[0,100,vmax-100,vmax]; pos=[0,  0.5,0.5,0.5];% 全体像
        case 2;intensity=[0,600,1000,vmax];     pos=[0.5,0.5,0.5,0.5];% 頭皮
        case 3;intensity=[0,1000,1500,vmax];    pos=[0,  0,  0.5,0.5];% 骨+軟部組織
        case 4;intensity=[0,1200,2000,vmax];    pos=[0.5,0,  0.5,0.5];% 骨
    end
    alphamap=interp1(intensity,alpha,queryPoints)';% 列ベクトル
    label=sprintf('intensity=[%d %d %d %d]',intensity);
    hu=uipanel(hf,'position',pos,'title',label);% subplotは使えません!
    hvol(n)=volshow(W,'parent',hu,'Colormap',map,'alphamap',alphamap,'backgroundcolor',[1,1,1]);
end
set(hvol,'ScaleFactors',scale,'CameraPosition',[1,-0.8,0.2],'CameraViewAngle',20,'Lighting',false);

get(hvol(4),'parent') % uipanelがPanelとして表示される
get(hu,'children') % uipanelからはhvolはchildrenとして認識されない!
ans =

  1×2 の int16 行ベクトル

   -2000    3071


ans =

  Panel (intensity=[0 1200 2000 2047]) のプロパティ:

              Title: 'intensity=[0 1200 2000 2047]'
    BackgroundColor: [0.9400 0.9400 0.9400]
           Position: [0.5000 0 0.5000 0.5000]
              Units: 'normalized'

  GET を使用してすべてのプロパティを表示


ans =

  0×0 の空の GraphicsPlaceholder 配列。

volshow関数でintensityとcolormapを変化させてみる
colormapもalphamapと三次元配列の最小値~最大値を256等分して計算しているようです。 alphamapとcolormapそろえると輝度のメリハリがはっきりします
close all;
W=V;
W(W<0)=0;
vmax=2047;
W(W>vmax)=vmax;
queryPoints=linspace(0,vmax,256);% 256固定
hf=figure;
alpha=[0,0,1,1];
for n=1:4
    switch n
        case 1;intensity=[0,100,vmax-100,vmax]; pos=[0,  0.5,0.5,0.5];% 全体像
        case 2;intensity=[0,600,1000,vmax];     pos=[0.5,0.5,0.5,0.5];% 頭皮
        case 3;intensity=[0,1000,1500,vmax];    pos=[0,  0,  0.5,0.5];% 骨+軟部組織
        case 4;intensity=[0,1200,2000,vmax];    pos=[0.5,0,  0.5,0.5];% 骨
    end
    alphamap=interp1(intensity,alpha,queryPoints)';% 列ベクトル
    colmap=alphamap*ones(1,3);
    label=sprintf('intensity=[%d %d %d %d]',intensity);
    hu=uipanel(hf,'position',pos,'title',label);% subplotは使えません!
    hvol(n)=volshow(W,'parent',hu,'Colormap',map,'Alphamap',alphamap,'Colormap',colmap);
end
set(hvol,'ScaleFactors',scale,'CameraPosition',[1,-0.8,0.2],'CameraViewAngle',20,...
    'backgroundcolor',[1,1,1],'Lighting',false);

volshow関数で三次元配列の方を変化させてみる
intensityを変化させるのは慣れてないので面倒です。 そこで三次元配列の値の方を変化させることとします。 alphamapとcolormapをそろえたものと比較して細かいゴミが映ってしまいました。
close all;
hf=figure;
alphamap=linspace(0,1,256)';% 列ベクトル
for n=1:4
    switch n
        case 1;ww=[0,2047];     pos=[0,  0.5,0.5,0.5];% 全体像
        case 2;ww=[600,1000];   pos=[0.5,0.5,0.5,0.5];% 頭皮
        case 3;ww=[1000,1500];  pos=[0,  0,  0.5,0.5];% 骨+軟部組織
        case 4;ww=[1200,2047];  pos=[0.5,0,  0.5,0.5];% 骨
    end
    W=V;
    W(W<ww(1))=ww(1);
    W(W>ww(2))=ww(2);
    label=sprintf('window window=[%0.0f %0.0f]',ww);
    hu=uipanel(hf,'position',pos,'title',label);% subplotは使えません!
    hvol(n)=volshow(W,'parent',hu,'Colormap',map,'alphamap',alphamap,'backgroundcolor',[1,1,1]);
end
set(hvol,'ScaleFactors',scale,'CameraPosition',[1,-0.8,0.2],'CameraViewAngle',20,'Lighting',false);

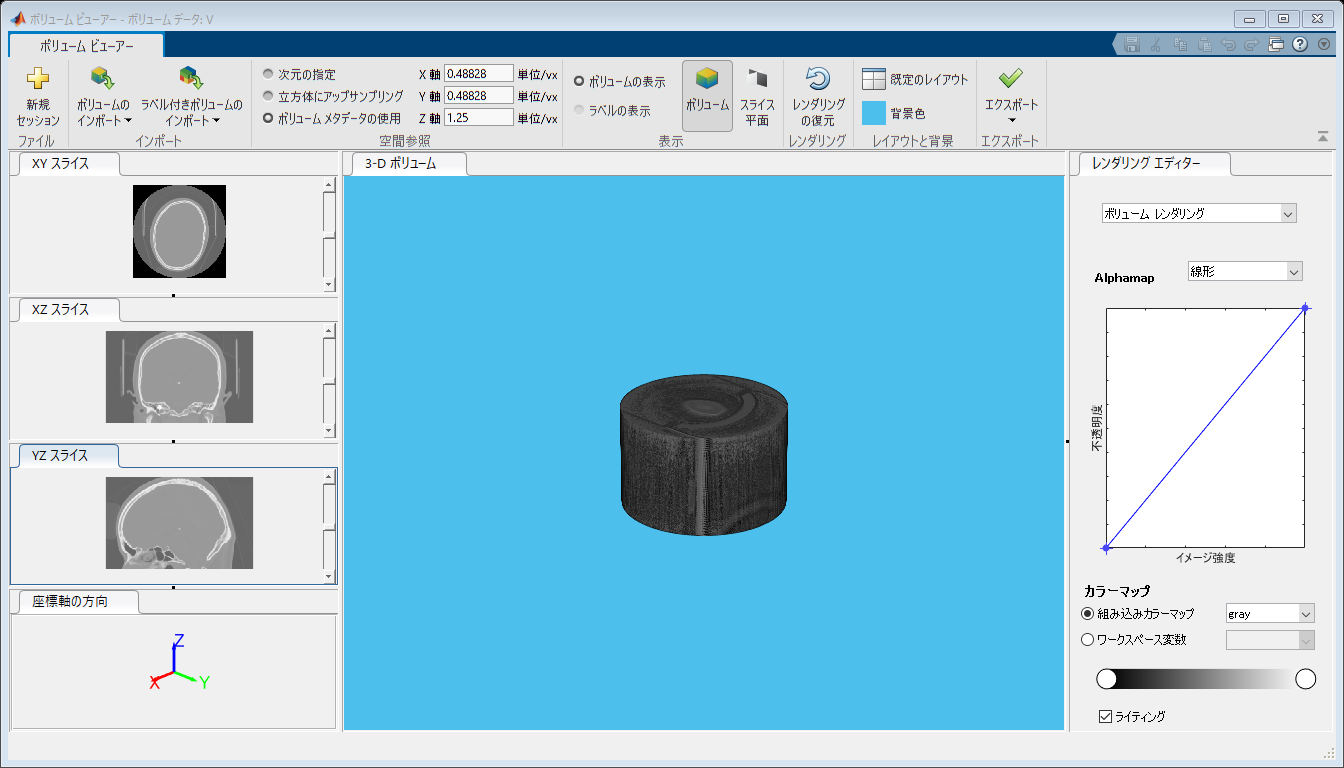
volumeViewer関数を使ってvolume rendering表示
R2017aからimage processing toolboxにvolumeViewer関数が用意されました。 対話形式で使いやすいと思いますが、コマンドラインではいじれないです。 alphamapとかは右のレンダリングエディタで対話形式で調整するしかありません。 なお何故かパブリッシュ機能でHTMLで書き出すと複数のvolumeViewerの絵が出力されてしまいました。 bugでしょうな。
close all;
volumeViewer(V,'ScaleFactors',scale);


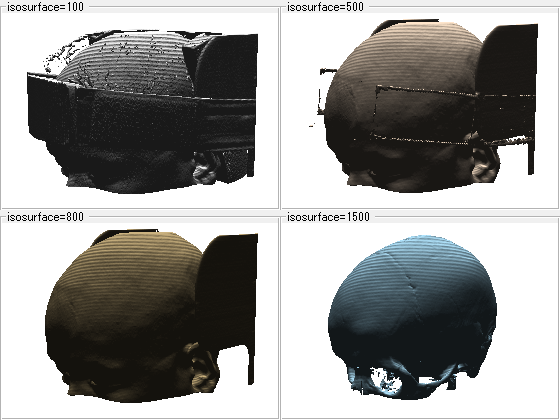
volshow関数でisosurface画像
volshow関数はvolume rendering以外の画像も作成できます。 volshow関数のrendererをisosurfaceにしてみます。 isovalueは三次元配列の最小値と最大値を0と1にして、0~1の間のどの値か指定する必要があります。 Lighting機能はtrueでもfalseでも変わりありません。 volumeViewer関数とは違って光源は上から下を照らす方向以外の設定はできないようでした。 下からのぞくと真っ黒け。 たぶん<br> なおisosurface画像ではalphamapやらcolormapは計算に関与してません。
volumeViewer close;
hf=figure;
vmin=double(min(V(:)));%Vはint16 doubleに変換しないとエラー
vmax=double(max(V(:)));
for n=1:4
    switch n
        case 1
            value=100;
            isosurfacecolor=[1,1,1];
            pos=[0,  0.5,0.5,0.5];
        case 2
            value=500;
            isosurfacecolor=[1,0.9,0.8];
            pos=[0.5,0.5,0.5,0.5];
        case 3
            value=800;
            isosurfacecolor=[0.8,0.7,0.5];
            pos=[0,  0,  0.5,0.5];
        case 4
            value=1500;
            isosurfacecolor=[0.7,0.9,1];
            pos=[0.5,0,  0.5,0.5];
    end
    isovalue=(value-vmin)/(vmax-vmin);
    label=sprintf('isosurface=%0.0f',value);
    hu=uipanel(hf,'position',pos,'title',label);
    hvol(n)=volshow(V,'parent',hu,'isosurfacecolor',isosurfacecolor,...
        'isovalue',isovalue,'renderer','Isosurface','Lighting',false);
end
set(hvol,'ScaleFactors',scale,'CameraPosition',[1,-0.8,0.2],'CameraViewAngle',20,...
    'backgroundcolor',[1,1,1],'Lighting',false);
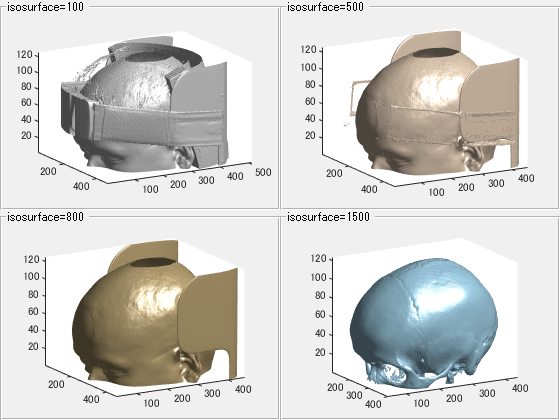
isosurface関数でisosurface画像作成
今まではisosurface関数を使ってisosurface画像を作成してました。めちゃめちゃ時間がかかってました。 volumeViewer関数の出力と同じような絵になりました。 個人的にはpatch objectとしていろいろ操作できるのでこちらの方が好きかな。volshow関数が熟練されることを期待してます。
close all;
hf=figure;
for n=1:4
    switch n
        case 1
            value=100;
            isosurfacecolor=[1,1,1]*0.9;%白だとなんも見えん
            pos=[0,  0.5,0.5,0.5];
        case 2
            value=500;
            isosurfacecolor=[1,0.9,0.8];
            pos=[0.5,0.5,0.5,0.5];
        case 3
            value=800;
            isosurfacecolor=[0.8,0.7,0.5];
            pos=[0,  0,  0.5,0.5];
        case 4
            value=1500;
            isosurfacecolor=[0.7,0.9,1];
            pos=[0.5,0,  0.5,0.5];
    end
    tic;
    fv=isosurface(V,value);
    toc;
    label=sprintf('isosurface=%0.0f',value);
    hu=uipanel(hf,'position',pos,'title',label);
    axes(hu);
    p=patch(fv);
    p.EdgeColor='none';
    p.FaceColor=isosurfacecolor;
    daspect(1./scale);
    view([60,15]);% 適当です!
    axis tight;
    camlight;
    lighting gouraud;
    rotate3d on;
end
経過時間は 57.440662 秒です。
経過時間は 20.222368 秒です。
経過時間は 16.716812 秒です。
経過時間は 44.575032 秒です。
volshow関数で最大強度投影
volshow関数のrendererをMaximumIntensityProjectionとします。最大強度投影法です。 rendererがdefaultのVolumeRenderingの時と同じく三次元配列の最大値と最小値を256分割して 256色で表示します。左上で2つの白い部分は骨が固い蝸牛や前庭の骨の部分です。 ここはCT値が高いですが、右上とか見てると白い部分がない! 最大強度投影になってないです。 頭の端から端まで計算するのではなく途中で止まっている感じ。bugなんだろうか?<br> なお、RendererがVolumeRenderingの時と異なり、colormap=alphamap*[1,1,1]とすると真っ白けになってしまうので、 alphamapとcolormapはそろえてません。
close all;
W=V;
vmin=-0;
W(W<vmin)=vmin;
vmax=3000;
W(W>vmax)=vmax;

queryPoints=linspace(vmin,vmax,256);% 256固定
hf=figure;
alpha=[0,0,1,1];
for n=1:4
    switch n
        case 1;intensity=[vmin,100,vmax-100,vmax]; pos=[0,  0.5,0.5,0.5];% 全体像
        case 2;intensity=[vmin,600,1000,vmax];     pos=[0.5,0.5,0.5,0.5];% 頭皮
        case 3;intensity=[vmin,1000,1500,vmax];    pos=[0,  0,  0.5,0.5];% 骨+軟部組織
        case 4;intensity=[vmin,1200,2000,vmax];    pos=[0.5,0,  0.5,0.5];% 骨
    end
    alphamap=interp1(intensity,alpha,queryPoints)';% 列ベクトル
    label=sprintf('intensity=[%d %d %d %d]',intensity);
    hu=uipanel(hf,'position',pos,'title',label);%
    hvol(n)=volshow(W,'parent',hu,'Colormap',map,'alphamap',alphamap,'renderer','MaximumIntensityProjection');
end
set(hvol,'ScaleFactors',scale,'CameraPosition',[1,-0.8,0.2],'CameraViewAngle',20,...
    'backgroundcolor',[0,0,0],'Lighting',false);% Lightingは関係ないみたい
